Arduino RGB Project
Arduino RGB Project
Overview
In this lesson, you will learn how to use a RGB (Red Green Blue) LED with an Arduino.
You will use the analogWrite function of Arduino to control the color of the LED

At first glance, RGB (Red, Green, Blue) LEDs look just like regular LEDs, however, inside the usual LED package, there are actually three LEDs, one red, one green and yes, one blue. By controlling the brightness of each of the individual LEDs you can mix pretty much any color you want.We mix colors just like you would mix audio with a 'mixing board' or paint on a palette - by adjusting the brightness of each of the three LEDs. The hard way to do this would be to use different value resistors (or variable resistors) as we played with in lesson 2. That's a lot of work! Fortunately for us, the Arduino has an analogWrite function that you can use with pins marked with a ~ to output a variable amount of power to the appropriate LED
Parts
To build the project described in this lesson, you will need the following parts.
Part
Qty

Diffuse RGB LED 10mm 1

270 Ω Resistors (red, purple, brown stripes) - you can
use up to 1K ohm although it will be a little dimmer 3

Half-size Breadboard 1


If we set the brightness of all three LEDs to be the same, then the overall color of the light will be white. If we turn off the blue LED, so that just the red and green LEDs are the same brightness, then the light will appear yellow.

Overview
In this lesson, you will learn how to use a RGB (Red Green Blue) LED with an Arduino.
You will use the analogWrite function of Arduino to control the color of the LED

At first glance, RGB (Red, Green, Blue) LEDs look just like regular LEDs, however, inside the usual LED package, there are actually three LEDs, one red, one green and yes, one blue. By controlling the brightness of each of the individual LEDs you can mix pretty much any color you want.We mix colors just like you would mix audio with a 'mixing board' or paint on a palette - by adjusting the brightness of each of the three LEDs. The hard way to do this would be to use different value resistors (or variable resistors) as we played with in lesson 2. That's a lot of work! Fortunately for us, the Arduino has an analogWrite function that you can use with pins marked with a ~ to output a variable amount of power to the appropriate LED
Parts
To build the project described in this lesson, you will need the following parts.
Part
Qty

Diffuse RGB LED 10mm 1

270 Ω Resistors (red, purple, brown stripes) - you can
use up to 1K ohm although it will be a little dimmer 3

Half-size Breadboard 1


Breadboard Layout
The RGB LED has four leads. There is one lead going to the positive connection of each of the single LEDs within the package and a single lead that is connected to all three negative sides of the LEDs.
The RGB LED has four leads. There is one lead going to the positive connection of each of the single LEDs within the package and a single lead that is connected to all three negative sides of the LEDs.
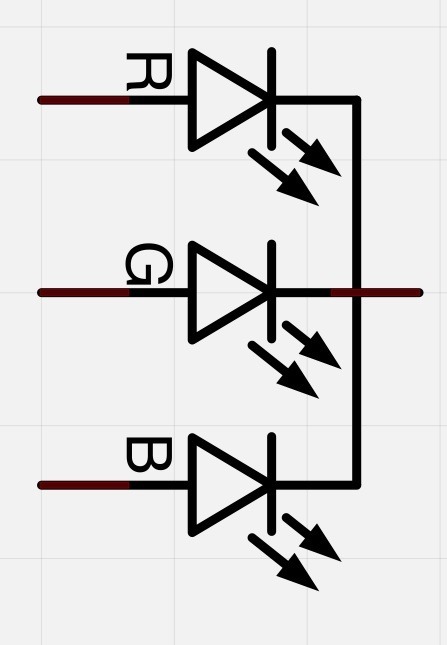
The common negative connection of the LED package is the second pin from the flat side of the LED package. It is also the longest of the four leads. This lead will be connected to ground.
Each LED inside the package requires its own 270Ω resistor to prevent too much current flowing through it. The three positive leads of the LEDs (one red, one green and one blue) are connected to Arduino output pins using these resistors
Each LED inside the package requires its own 270Ω resistor to prevent too much current flowing through it. The three positive leads of the LEDs (one red, one green and one blue) are connected to Arduino output pins using these resistors

Colors
The reason that you can mix any color you like by varying the quantities of red, green and blue light is that your eye has three types of light receptor in it (red, green and blue). Your eye and brain process the amounts of red, green and blue and convert it into a color of the spectrum.
In a way, by using the three LEDs we are playing a trick on the eye. This same idea is used in TVs, where the LCD has red, green and blue color dots next to each other making up each pixel

We can control the brightness of each of the red, green and blue parts of the LED separately, making it possible to mix any color we like.
Black is not so much a color as an absense of light. So the closest we can come to black with our LED is to turn off all three colors.
Black is not so much a color as an absense of light. So the closest we can come to black with our LED is to turn off all three colors.
Arduino Sketch
The following test sketch will cycle through the colors red, green, blue, yellow, purple, and aqua. These colors being some of the standard Internet colors.
/*
Arduino - RGB LED
*/
int redPin = 11;
int greenPin = 10;
int bluePin = 9;
//uncomment this line if using a Common Anode LED
//#define COMMON_ANODE
void setup()
{
pinMode(redPin, OUTPUT);
pinMode(greenPin, OUTPUT);
pinMode(bluePin, OUTPUT);
}
void loop()
{
setColor(255, 0, 0); // red
delay(1000);
setColor(0, 255, 0); // green
delay(1000);
setColor(0, 0, 255); // blue
delay(1000);
setColor(255, 255, 0); // yellow
delay(1000);
setColor(80, 0, 80); // purple
delay(1000);
setColor(0, 255, 255); // aqua
delay(1000);
}
void setColor(int red, int green, int blue)
{
#ifdef COMMON_ANODE
red = 255 - red;
green = 255 - green;
blue = 255 - blue;
#endif
analogWrite(redPin, red);
analogWrite(greenPin, green);
analogWrite(bluePin, blue);
}
Before we take a look at the 'loop' function, lets look at the last function in the sketch.
void setColor(int red, int green, int blue)
{
analogWrite(redPin, red);
analogWrite(greenPin, green);
analogWrite(bluePin, blue);
}
{
analogWrite(redPin, red);
analogWrite(greenPin, green);
analogWrite(bluePin, blue);
}


Comments
Post a Comment